Showing posts with label craft. Show all posts
Showing posts with label craft. Show all posts


Hello blog friends. I love giving mason jar gifts for the holidays because they are quick gifts to make for family, friends, or neighbors.
I shared how to make this reindeer droppings mason jar gift a few years ago. This mason jar gift idea is a cute idea for a child.

I shared this mason jar gift with chocolate candy inside the jar. Mason jar gifts are so easy and fun to make and you can customize them however you like.

Here are some other ideas you can use for mason jar gifts:
- hot chocolate mason jar
- cookie mix mason jar
- spa day mason jar
- cookies in a mason jar
- tea theme mason jar
Have fun making mason jar gifts!
Julie


Hello blog friends. We have only a few weeks left until Christmas so I thought I'd share with you some easy holiday craft projects.
I shared how to make this dollar store Christmas wreath two years ago on the blog. This wreath is so easy to make and I've been hanging this festive wreath on my kitchen door ever since making it. You can always change up the ornaments to hot glue onto the wreath. I found my ornaments two years ago at the Dollar Tree store.

I made these crochet Christmas mittens ornaments last year and they were easy and fun to make. If you know how to crochet, you can whip these up very fast. They look cute and festive on a Christmas tree. You can also add inside the mitten holiday candy or a gift card for gift giving.

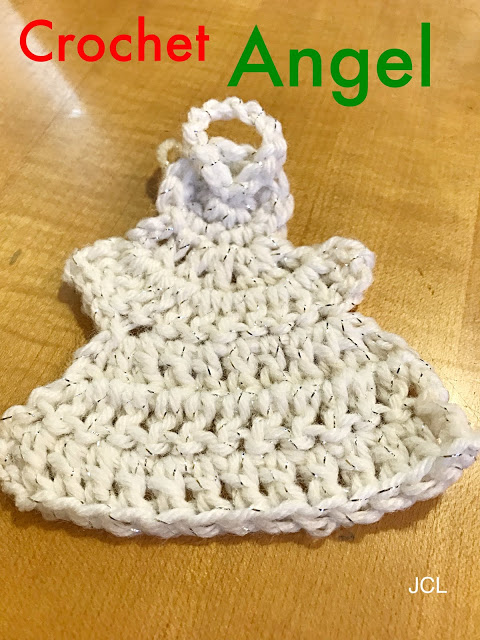
I crocheted some angel ornaments about two years ago and gave them out to friends and family. These crocheted angels look so festive on a Christmas tree or a present.
I made some crochet towel holders last year to decorate my kitchen for the holidays. I crocheted them in red and green colored yarn. They look so festive holding your kitchen Christmas towels.

I made these crochet face scrubbies last year to give for Christmas presents. I used a cute makeup bag and added the face scubbies along with some fancy soap. This makes a great handmade gift idea.

HAPPY CRAFTING EVERYONE!

|
Hello blog friends.
I hope you are all enjoying the summer. I wanted to give my plant stand a new makeover. The plant stand I have looked old and was rusted in spots.
I hope you are all enjoying the summer. I wanted to give my plant stand a new makeover. The plant stand I have looked old and was rusted in spots.
The before photo on the left shows how the stand looked old and rusty. The stand on the right is the painted plant stand makeover.


 |
I first cleaned the plant stand with some Mrs. Meyers cleaner. I then used leftover paint I had from my bathroom redo we did a few years ago.
I used for the bathroom walls paint from Valspar called Gravity 4005-1B.
 |
I used a small paintbrush and then I used two coats of paint on the stand. I let the stand dry overnight. I'm glad I had the leftover paint to use on the plant stand and make it look pretty. |
 |
| DIY PLANT STAND MAKEOVER |
Have you done any DIY projects lately?

Hello blog friends.
With Easter fast approaching, I decided to share with you an easy to make Spring/Easter Wreath.
I made this wreath a few years ago and I decided to share it with you again.
 |
This wreath is so easy to make. The easy part about making this is that there is no glue involved to make this wreath. You can't beat that!
All of the items to make this wreath were found at Michaels craft store a few years ago. If you can't find the exact items in the craft store then you can use similar items to make this wreath.
I am sure you can find some of these items at my favorite store Dollar Tree to make this wreath.
 |
Supplies Needed:
Foam Ring
2 Large Fake Flowers (with clips on the back)
A Roll of Burlap
 |
3 Packages of Smaller Fake Flowers in the colors white, light pink, dark pink
Ribbon
Felt Easter Eggs
Bunnies
 |
DIRECTIONS TO MAKE WREATH
Take the foam ring and tape the burlap onto the back of the ring. Then wrap the burlap all around the ring to the end and tape. Next, tie the ribbon onto the ring and wrap all the way around the ring. Next, add the two big flowers onto the side of the wreath by clipping them onto the ribbon.
Next, add in the smaller flowers and bunnies by tucking them into the ribbon.
The felt Easter eggs have peel backs that you can just stick onto the wreath.
This is what the wreath looked like when I was finished decorating it. This wreath is so easy to make and can be made in minutes. The best part is there is no hot glue gun needed!
 |
| Spring/Easter Craft Wreath |
BE CREATIVE!
Thanks for stopping by and see you all soon!
Click HERE to see the great parties I will be linking up to!
Julie

Hello blog friends. I hope you're all enjoying this holiday season. One of the ways that I have been enjoying this season is by doing some crafting.
Each year I really love making my own Christmas decorations.
 |
I really wanted to make my own Christmas wreath this year for my back door. I was so happy and thrilled to visit the dollar store back in November for all of my supplies. I LOVE the Dollar Tree store!
I also used some items I already had in my stash such as the ribbon and garland. I bought the red and white ribbon (that was already curled) in a local card store and the garland in a local dollar store.
This wreath was so much fun to make and it took me less than a half hour to make.
SUPPLIES TO MAKE WREATH:
 |
- 5 Christmas Ornaments
- 1 Bow
- Garland - I had this in my stash
- Red and White Ribbon - I had ribbon in my stash (The ribbon was already curled)
- Glue Gun
- Small Wreath
- Small Door Hanger
 |
I laid out all of my supplies on newspaper.
I took the pine cone and holly off of the red bow as in the photo above in the lower right hand corner. I used instead the red and white ribbon. The red and white ribbon came already curled, so I didn't need to curl the ribbon. I used the twist tie on back of bow and tied it to the wreath.
Next I decided where I wanted my ornaments to be placed on the wreath.
 |
I next heated up the glue gun. Once the glue was hot, I hot glued the garland, ornaments, and bow onto the wreath.
 |
 |
Dollar Store Christmas Wreath |
 |
Thanks for stopping by. I hope I've inspired you to do some crafting and make your own Dollar Store Christmas Wreath!
Enjoy the rest of the week and have a nice weekend.
Click HERE to see the great parties I will be linking up to!
Julie

Hi friends. I just wanted to update you on the crochet lap blanket that I've been working on for the winter. In case you missed the post I did of this lap blanket I'm making, and the details for the yarn, and pattern, you can click HERE.
Shown below is how much progress I've made on the blanket.

Thanks everyone and enjoy!
Julie
Shown below is how much progress I've made on the blanket.
I'm more that half way finished crocheting this blanket, and I just need to finish a small section of it. It will be donated to our annual crochet sale that we will have at my church in the fall.
I will be so happy to have this lap blanket all finished and then I'll be on to more crochet projects of course.
Do you have any fun, and crafty projects that you are working on right now?
Wishing you all a nice weekend and see on Monday for Cooking and Crafting with J & J!
Click HERE to see the great parties I will be linking up to!
Thanks everyone and enjoy!
Julie

|
Hello friends! With Halloween fast approaching I decided to make a crochet ghost. I made this in no time and I'd love to share with you how I made it.
This easy craft took me about 2 hours tops to make.
This easy craft took me about 2 hours tops to make.
 |
CROCHET GHOST
What you will need to make the ghost:
Yarn: White Red Heart Yarn - for ghost
Black Red Heart Yarn - for eyes, to tie around ghost, & to hang
Crochet Hook: US Hook size I
Cotton Fill
ch = chain
hdc = half double crochet
Directions:
Chain 22
hdc in second ch from hook. Continue with hdc all the way to end of row. When you get to the end of row ch 2 and turn. Continue this way until you have 14 rows done. Weave in both ends of yarn. This will now look like a square shape. Take a small amount of cotton filling and form into a ball. Place this in middle of the crocheted piece. Take a long piece of cut black yarn and tie a bow around the neck of the ghost. Sew in two eyes with black yarn and add a long piece of yarn at the top of ghost and then tie a knot at the end to hang up.
Done.
Julie

Hi friends and Happy Fall!
I love fall and I decided this year to buy some new fall decorations and make my own crocheted apples.
My daughter and I went to Michael's craft store and she helped me pick out the fall decorations and the yarn to crochet the apples.
My first attempt to crochet an apple was not good and the apple looked to me like an orange shape. I was determined to make one with a pattern I liked, so I used a different pattern and it was a lot easier for me to crochet.
The apple I have shown here is my second attempt at the apple with a different pattern. I'm so happy I found this crochet pattern.
Here is the information to crochet your own apple:
The pattern to make this crocheted apple was found on Pinterest. The pattern can be found HERE.
Crochet Hook: US Size G
Yarn: Apple - Red Yarn, Red Heart Soft - Wine Art. E7284608
Leaf - Green Yarn, Red Heart Soft - Dark Leaf Art. E7289523
Stem - Leftover yarn from my yarn stash
** You can use whatever yarn and colors you like to make your own apple.
I had so much fun crocheting this once I figured out how to make the apple. I hope I have inspired you to crochet your own apple too!
Thanks for stopping by and wishing you a wonderful Fall weekend!
See you all back here on Monday for Cooking and Crafting with J & J. We can't wait to see what you create and share with us.
Thanks everyone and Enjoy!
Julie

Hi friends, it has been so hot here this summer and I have been busy and just too hot to crochet. Instead I have been working on small projects and I made another sunglass case but this time using cotton yarn.

I had so much fun crocheting the sunglass case that I made back in July, and incase you missed that post on the other sunglass case I made, you can click HERE to see it.

You can also use this for your sunglasses or eyeglasses. I really enjoyed making this project and it can be made in just a few hours.
The yarn I used is Lion Brand Yarn, Kitchen Cotton, in the color 147 Grape. The crochet hook I used was US size H or I. For the pattern to make your own sunglass case, you can click HERE.
Incase you did not know, I will also be donating this to our church's holiday crochet sale that we have each year in the fall. I hope I have inspired you to make one too. These also make great gifts and you can make them in many different colors.
Julie

Hi friends, I have a simple crochet wreath ornament that you can make in minutes!

Here are the directions to make this easy and simple Crochet Christmas Wreath Ornament.
Crochet Christmas Wreath Ornament
Crochet Hook: U.S. size G or H
Yarn: green yarn is by Ice Yarns in light green, gold yarn is Vanna White Vanna's Glamour by Lion Brand Yarn in the color 170 Topaz, red yarn is Red Heart Yarn
ch = chain
sl st = slip stitch
hdc = half double crochet
Chain 9, sl st to make a ring. Chain 3 and make 15 hdc in ring. Sl st to end of top of the 3 chain. Make a loop and tie a knot to end. Take red yarn and cut 9 inches long to make a bow and attach at the top of the wreath.
NOTE: This wreath ornament can be made with a single crochet, or double crochet stitch.
This wreath can also be made into a pin by adding a small safety pin onto the back of the wreath.
To make this mini wreath ornament I made last year you can click HERE.

These crochet wreath ornaments are made in U.S. Terminology.
I hope I have inspired you to make some crochet wreath ornaments for Christmas. These would also look nice attached onto a Christmas present.
Click HERE to see the great parties I will be linking up to!
Julie

Hi everyone, now that the weather is getting cold outside I thought I would share with you a few scarves that I'm in the process of knitting and trying to get done! I have been knitting these for a long time and I always seem to put one of them aside and not work on it. The reason is I'm always crocheting or knitting for our Christmas crochet sale that we have at our church each year.
These are my scarves that I'm in the process of knitting!
The scarf below is the drop stitch and to see how to knit this you can click HERE.
Some of you may recognize this purple yarn, it's yarn I received from Stephanie's tea mug exchange I was involved in. If you missed that post you can see it HERE.

The scarf below is called the seed stitch and to see how to knit this you can click HERE. I plan on making this into an infinity scarf.


These are my scarves that I'm in the process of knitting!
The scarf below is the drop stitch and to see how to knit this you can click HERE.


The scarf below is called the seed stitch and to see how to knit this you can click HERE. I plan on making this into an infinity scarf.


My goal is to try and work on these scarves and have them each completed by 2015! Wish me luck!
Do you have any unfinished projects that you would like to have finished soon too?

Hi friends, I have this Thanksgiving Chalkboard Art sign I made and displayed on my mantel that is so easy to make for any holiday.
You can see the sign I decorated on my mantel with my pilgrim statues. I also have my crocheted pumpkins I made too. In case you still want to make and crochet the pumpkins you can see the post HERE. To go directly to the pattern for the crochet pumpkins you can go HERE.


I bought the pilgrim statues many years ago when I worked in New York City.

I also have displayed little plastic pumpkins and they too are from a dollar store along with the leaves.

You can see the sign I decorated on my mantel with my pilgrim statues. I also have my crocheted pumpkins I made too. In case you still want to make and crochet the pumpkins you can see the post HERE. To go directly to the pattern for the crochet pumpkins you can go HERE.
I bought the pilgrim statues many years ago when I worked in New York City.
CHALKBOARD ART
To make the chalk board art you need:
1 art canvas - any size
1 can Krylon chalkboard paint - color 807 Black
newspaper to lay on floor
chalk
Directions:
Take newspaper and lay on the floor (so that you don't make a mess). Take your canvas and spray paint it 2 to 3 times. Next let the canvas dry throughly. When dry you are ready to make your chalkboard art.
I hope I have inspired you to make one too!
Julie

This is my latest crochet project that I finished to go with the Infinity Scarf and Handwarmers Set I just made. I had just a little ball of yarn left over and this was the perfect project to make. In case you missed the blog post on the set I made you can see it HERE.
To make your own crochet headband you can click HERE for the pattern!
Here you can see year last year I was so inspired to crochet some mini pumpkins in all different colors.

Just in case you missed that blog post and want to make some for fall and Halloween you can click HERE!
Do you have any fun crochet or knit projects you are working on?
Wishing you all a wonderful fall weekend!
Thanks everyone and Enjoy!
Julie

The color of these potholders/dishcloths sure do remind me of fall and it's just around the corner.
I have been crocheting potholders lately and these are a fun and quick project to make. I love crocheting these in the summertime when it is too hot to go outside. I don't like working on anything heavy either like a blanket as it will be sitting on my lap.


I am making these and donating them for our annual Christmas Fair at my church. The yarn that I used is Bernat, Handicrafter Cotton, Harvest Home Collection in the color Landscape. This yarn was provided for me to use by my crochet group. The crochet hook I used is US size H.
To see the pattern that I used to make these potholders please visit HERE and to visit my past blog post of the dishcloths I made click HERE.
I hope I've inspired you to make these fun and easy potholders. These make great gifts for any occasion.
Julie
Subscribe to:
Comments (Atom)


Social Icons