
Hello friends. I hope you are all enjoying the week. I am to but I just can't believe it's already the end of July. 😎 How can the summer be flying by so fast?
When I was first married I used to make meatballs all the time! I used to make them and then I'd spend hours frying large batches of the meatballs and then freeze the rest of them. Doing it that way I figured it was a great way to make and save them for another time to defrost and eat.
It used to take me a long time to fry and get them all dark and crunchy on the outside. I'd then be covered in grease from the day of making fried meatballs. Boy, was that tiring but the meatballs tasted so good!
Then after a while I stopped making the meatballs that we all loved eating. I would buy a small bag of frozen meatballs from Trader Joe's to eat. After that I would take the easy way out and buy a huge bag of frozen meatballs from Costco.
After a while I had to make the meatballs. My husband and daughter would beg me constantly to make them.
It has been years since I made my own meatballs!
I was so happy when I stumpled upon this recipe for meatballs from the blog Our Unschooling Journey Through Life. She made a HUGE batch of them, but I cut the recipe in half and made a smaller batch of them that you bake right in the oven. They are baked in the oven on a high heat but they only take 20 minutes to bake. The inside of the meatballs come out tasting moist and the outside are crunchy and they taste like they were fried.
These baked meatballs taste so good, are so easy to make, and only take minutes to bake!
You can always change around the recipe to your liking like I did.
I added Almond milk for where the recipe calls for milk. I made these meatballs a second time and added more garlic (two teaspoons), a little bit more milk, and two eggs.
If you would like to see the original recipe, you can click here at the Our Unschooling Journey Through Life blog.
Please let me know if you make these meatballs and how you liked them.
Thanks for stopping by and enjoy the rest of the week and weekend.
Click HERE to see the great parties I will be linking up to!
Julie
Well, I LOVE MEATBALLS! Do you? If you do you are going to love this meatball recipe I'm sharing with you.
I was so happy when I found this recipe at our blog party I co-host with Jess at our Monday Cooking and Crafting with J & J Link Up.
 |
| Easy Meatball Recipe |
When I was first married I used to make meatballs all the time! I used to make them and then I'd spend hours frying large batches of the meatballs and then freeze the rest of them. Doing it that way I figured it was a great way to make and save them for another time to defrost and eat.
It used to take me a long time to fry and get them all dark and crunchy on the outside. I'd then be covered in grease from the day of making fried meatballs. Boy, was that tiring but the meatballs tasted so good!
 |
| Large Batch of Meatballs |
Then after a while I stopped making the meatballs that we all loved eating. I would buy a small bag of frozen meatballs from Trader Joe's to eat. After that I would take the easy way out and buy a huge bag of frozen meatballs from Costco.
 |
After a while I had to make the meatballs. My husband and daughter would beg me constantly to make them.
It has been years since I made my own meatballs!
I was so happy when I stumpled upon this recipe for meatballs from the blog Our Unschooling Journey Through Life. She made a HUGE batch of them, but I cut the recipe in half and made a smaller batch of them that you bake right in the oven. They are baked in the oven on a high heat but they only take 20 minutes to bake. The inside of the meatballs come out tasting moist and the outside are crunchy and they taste like they were fried.
These baked meatballs taste so good, are so easy to make, and only take minutes to bake!
You can always change around the recipe to your liking like I did.
I added Almond milk for where the recipe calls for milk. I made these meatballs a second time and added more garlic (two teaspoons), a little bit more milk, and two eggs.
 |
| Meatballs Recipe |
Meatball Recipe
This is a delicious and easy recipe for baked meatballs.
Ingredients
- 1 1/2 lb. ground beef
- 1 1/2 cup bread crumbs
- 1/3 cup milk
- 1/2 cup Parmesan cheese
- 1 teaspoon parsley
- 1 teaspoon Italian seasoning
- 1 teaspoon minced garlic
- 1 egg
Instructions
Combine bread crumbs, milk, Parmesan cheese, parsley, Italian seasoning, garlic together in a large bowl. Then add eggs and ground beef and mix until well combined. Using an ice cream scoop, scoop up the meaballs making sure to press the scoop against the sides of the bowl so meaballs are tightly packed together. Put them on parchment lined baking sheets making sure to leave room between each meatball. Bake them for 20 minutes on 475 degrees F.
Details
Prep time: Cook time: Total time: Yield: large batchIf you would like to see the original recipe, you can click here at the Our Unschooling Journey Through Life blog.
Please let me know if you make these meatballs and how you liked them.
Thanks for stopping by and enjoy the rest of the week and weekend.
Click HERE to see the great parties I will be linking up to!
Julie

Hello friends. Well, I'm glad to back from my blogging break!
I hope you all had a great 4th of July. I had a really nice day and we packed everything up early and headed to the beach. It was a little crowded but we enjoyed ourselves since the water was so warm to swim in. We also enjoyed watching the fireworks.
 |
I recently found an awesome recipe a while back from my blogging buddy Heather, who blogs at Our Life In a Click. She loves cooking Vegan and healthy foods for her family.
Heather recently made a Tofu Scramble that she shared on her blog. This dish is great for people that do not like to eat eggs since there are no eggs in this recipe. For the recipe, you use tofu instead of eggs.
To see the recipe on how to make this tofu scramble you can click HERE.
We all are trying to eat healthier so I decided to try out this recipe since it looked so good. I made this recipe a few weeks ago and we all loved it and it tasted just like eggs.
I gathered some of the ingredients along with salt, pepper, garlic powder, firm tofu, a can of rinsed and drained chickpeas, and some baby spinach.
 |
I also added a package of vegetables that included broccoli, red and green peppers, and onions that were cleaned and chopped up already.
I let all of that simmer in a large pot with olive oil for a few minutes.
 |
I next added in drained and crumbled up tofu to the veggies. I let that all cook for a while.
 |
I next added in some tumeric for flavor and coloring. I did not have all of the ingredients that were in the recipe and left out the aminos and brussel sprouts.
I let this all cook for a while until the veggies were all cooked through.
 |
My daughter and I really loved this dish and she had hers with brown rice and I had mine with whole wheat toast for dinner.
This dish is great for breakfast, lunch, or dinner!
 |
Thanks, Heather for the recipe to make this tofu scramble. It really does taste like eggs and vegetables.
I hope some of your will also be inspired to cook this healthy tofu scramble.
Thanks for stopping by and enjoy the end of the week and weekend.
Don't forget to stop by for our Monday Cooking and Crafting with J & J Link Up!

GRATEFUL BLOGGER!!
 |
| Blogging at Julie's Creative Lifestyle |
Hello friends. I just wanted to mention that as of June 2018, after blogging for a little over 5 1/2 years I have received over 1,000,000 page views on my blog!
It seems so unreal and crazy to me and I wanted to give you all a big THANK YOU!
I am so grateful and happy that I have all of you as my blog friends. It means so much to me that you all take the time out of your busy days to stop by and read my blog. You all are the best! I really love and appreciate the blog friendships that I have made after all of these years with all of you. I too enjoy visiting and reading your blogs each week to catch up with your lives and to see what is new with you.
BLOGGING EMAIL ISSUE FIX
There seems to be a blogging issue that started as of May 25, 2018, because Blogger/Google and emails updated the security protection. Bloggers are not receiving email notifications when someone leaves a comment on your blog and they are also a no-reply blogger. This is only for people on BLOGGER.
Well, there is a way to fix this problem and receive email notifications again in your email inbox. The solution is very easy to fix.
I found out how to fix this problem by visiting two bloggers who have written out blog posts on how to correct the problem.
If you visit Nana Diana Takes a Break's blog HERE it explains all the steps to take to fix it.
There is also another blogger Lisa from Life Away from the Office Chair who has written a blog post on how to fix the problem found HERE.
I hope you visit these blogs as I visited Nana Diana Takes a Break and I did exactly what it says and it's working just great for me!! YAY!!
HAPPY BLOGGING FRIENDS!
Thanks, Diana and Lisa for writing out these really helpful blog posts for fixing the email notification problem. We, bloggers, appreciate the help and fix for this problem.
Click HERE to see the great parties I will be linking up to!
Julie

Hi everyone. This post is the final reveal of the Finished Bathroom Gut and Redo!
The bathroom had to be gutted out of everything in the old bathroom. This is what the bathroom looked like when everything inside was ripped out and taken away. Not too pretty!
As a result of gutting out the bathroom, there was so much dust and mopping I had to do each day. It was a lot of work for us to keep clean, but worth it.
We decided to put in a glass shower door over the tub. I am not used to that look and always had a shower curtain for this bathroom, but now I really like it.
One of my favorite parts about this bathroom is the vanity. I really love it and it works like a dresser drawer. The vanity is large and can hold a lot of items. It has some dividers inside the drawers for different sections to hold things. The top drawer does not open due to the plumbing, but the bottom two drawers do open and can hold a lot.
I love this toilet and it's narrow and has a dual flush on top and it's by Kohler. The bottom sides of the toilet are very easy to keep clean. The toilet paper holder is from Bed Bath and Beyond and I was so happy that they have a huge selection of toilet paper holders.
I had the tile put up on some of the walls because the wall used to get holes in it and now that will not happen. The towel rack is from Lowe's and I have two hooks on the back of the door from there too. I chose a light grey color for the walls and I like how it goes well with the rest of the bathroom.
The medicine cabinet is just the perfect size. It can hold a lot of items and I have it set up like a drug store all neat. The faucet is the brushed nickel look.
I decided to go with a tile floor but the wood look. I just love the way this looks and it's so easy to keep clean.
The ceiling used to come down low and the workers took it away so that I now have a high ceiling. With the four lights, I now have plenty of light in the bathroom.
We decided to keep our old door since it was not in bad condition. It just needed a new coat of white paint. I did change the gold doorknob to silver brushed nickel.
We are so happy with the way the finished bathroom came out and we all enjoy using it. I love that it is brand new and updated.
 |
| Bathroom Gutted Out |
We decided to put in a glass shower door over the tub. I am not used to that look and always had a shower curtain for this bathroom, but now I really like it.
 |
| New Bathroom |
One of my favorite parts about this bathroom is the vanity. I really love it and it works like a dresser drawer. The vanity is large and can hold a lot of items. It has some dividers inside the drawers for different sections to hold things. The top drawer does not open due to the plumbing, but the bottom two drawers do open and can hold a lot.
 |
| Bathroom Vanity |
I love this toilet and it's narrow and has a dual flush on top and it's by Kohler. The bottom sides of the toilet are very easy to keep clean. The toilet paper holder is from Bed Bath and Beyond and I was so happy that they have a huge selection of toilet paper holders.
 |
I had the tile put up on some of the walls because the wall used to get holes in it and now that will not happen. The towel rack is from Lowe's and I have two hooks on the back of the door from there too. I chose a light grey color for the walls and I like how it goes well with the rest of the bathroom.
 |
The medicine cabinet is just the perfect size. It can hold a lot of items and I have it set up like a drug store all neat. The faucet is the brushed nickel look.
 |
I decided to go with a tile floor but the wood look. I just love the way this looks and it's so easy to keep clean.
 |
| Bathroom Wood Tiled Floor |
The ceiling used to come down low and the workers took it away so that I now have a high ceiling. With the four lights, I now have plenty of light in the bathroom.
 |
| High Ceiling |
We decided to keep our old door since it was not in bad condition. It just needed a new coat of white paint. I did change the gold doorknob to silver brushed nickel.
 |
| New Door Handle |
Below is the FINISHED BATHROOM!
 |
YAY! WE LOVE OUR NEW BATHROOM!!
Thank you to everyone who visited me for this bathroom series. Everything we used to renovate in this bathroom is from Lowe's. This was not a sponsored post for Lowe's.
Hope you all enjoy the rest of the week and weekend.

Hello friends. Today I'm sharing with you Part Two of my Bathroom Redo. In case you missed Part One, you can read about that HERE.
(This is a photo of the old Bathroom).

We finally made our decision to have Lowe's do our bathroom gut and redo after having a long consultation meeting with the experts at Lowe's.
My husband and I wanted to have Lowe's do the work since we liked all of their products and everything was available for the bathroom in one place.
First I had to pick out the color scheme I wanted for the bathroom. I love the grey and white look and went with that color scheme. I spent about two and a half hours picking out everything with a salesperson and ordering everything.
I had to pick out the tiles I wanted for the shower walls. I also decided I liked the look of tiles going half way up the wall outside of the shower too. I picked out white with grey large tiles for the walls.
I decided I liked the look of wood for the floor. I picked out the grey wood tiles for the floor.
(Wood tile for the floor and grey and white tile for the walls).

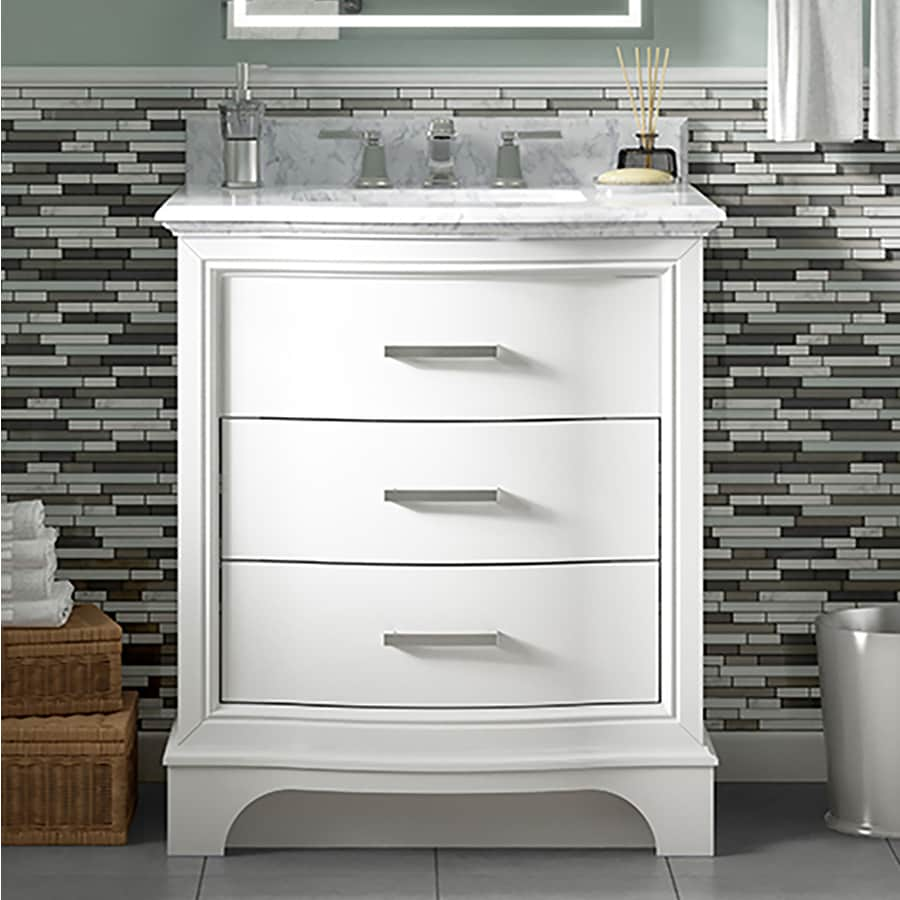
I had trouble deciding on what kind of vanity I wanted. I originally wanted the vanity seen below top left photo but that would not be available until the middle of February 2018. We decided we were going to have the work done the beginning of January 2108. We did not want to wait that long for the vanity so after very much thought and consideration I decided on the vanity in the lower left photo.
I was lucky because the vanity I chose came in a larger size and was available within one week. I love how the bathroom vanity looks like a dresser drawer. The top drawer does not open due to the plumbing but that's ok with me. This style is a lot different than what I'm used to but nice because it makes me not keep as many unnecessary things in the drawers that I don't use or need. I keep everything else that I need in my linen closet in organizing baskets.
(Deciding on new vanity for the new bathroom).

I had to choose a new tub, shower head, and accessories for the tub, and a new shower door. I chose everything in the brushed nickel look.
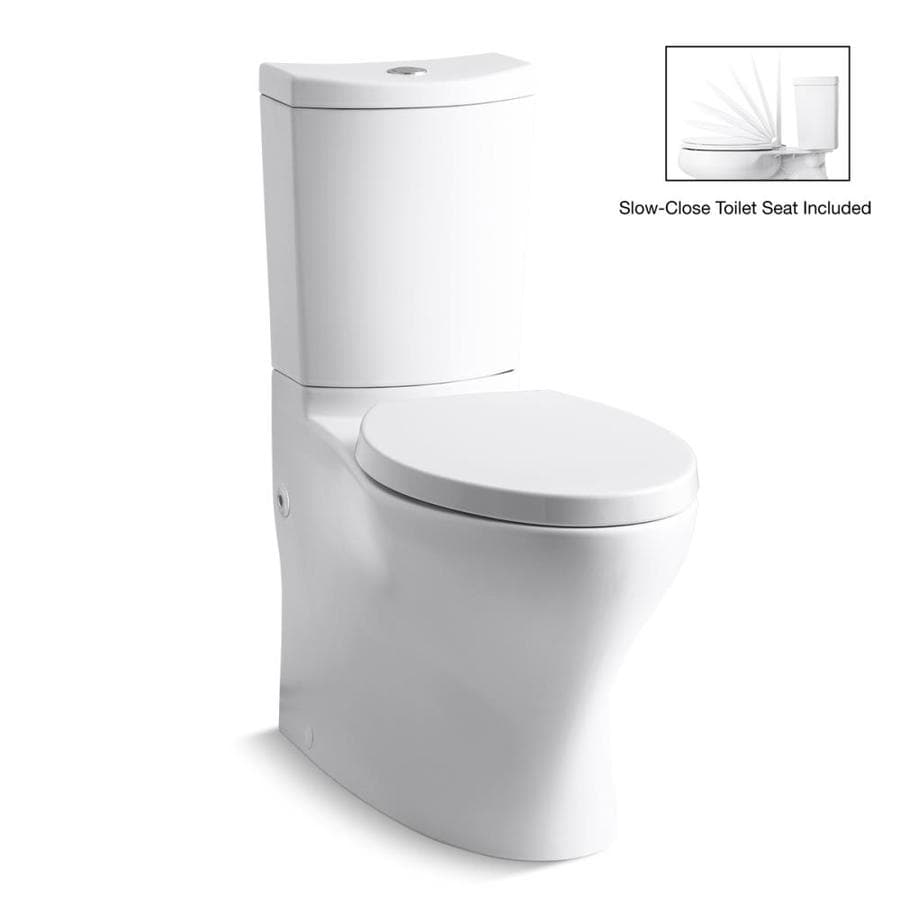
I also had to pick out the toilet and picked out a Kohler top button duo toilet. I love the sleek look of this toilet. The smooth bottom will be great when cleaning the toilet. The toilet also sits higher off the floor.
I never had a shower door in this bathroom before and I always used a shower curtain which I really liked. The one request from my husband was a shower door. Well, I decided on one but with a frosted door. I did not want guests coming over to use the bathroom and seeing everything in the shower.
The shower door I picked out is similar to the one shown below but sits on top of a tub. I figured one of us might want to take a bath at some point.

I next had to decide on what bathroom paint color I wanted on the walls.

After looking through many paint chips and paint samples for the walls I decided to use the paint and color shown above.
I love this color and it looks great on the bathroom walls. This paint color goes really nice with everything.
Below you can see how I bought a small sample of the paint color and painted spots on the bathroom walls. I found that this was a great way to decide on the paint color I wanted for the walls.

Well, that is Part Two of the bathroom gut and redo. Please stay tuned for Part Three coming soon, for a look at our finished bathroom.
Thanks for stopping by and reading about my bathroom redo. I hope you all enjoy the rest of the week and weekend.
Don't forget to visit us at our Monday Cooking and Crafting with J & J Link Up.
Click HERE to see the great parties I will be linking up to!
Julie

Hi everyone, and Welcome to my Part One of a Three Part Bathroom Redo Series!
This is a photo of my old Bathroom as for the rest of the photos on this post.
 |
| BEFORE BATHROOM REDO |
I have been living in my house for 23 years now and I just love it!
When we moved into our house we didn't do any renovations. We just moved into the house and had it painted. We both decided to live in the house for a while and see what we wanted to change over time. We were both working and we didn't have that much money to spend on redoing anything major in the house.
Well, over time and years we have done so many renovations to this house such as the kitchen, two bathrooms, the living room, basement, and of course the outside of our house, and yard.
I love our house and it has so much charm as it was built in 1924. I have talked numerous times with my husband about renovating this bathroom. We do not have a bathroom on our main floor, so we have to go up one flight of stairs or use the basement bathroom. I also have a bathroom off our master bedroom that was redone 18 years ago and it still looks great.
This bathroom has been functional and just OK but the bathroom was so old and outdated. I think the last time it was updated was like 40 years ago. The window did not open or work well and the fixtures were gold as that used to be very popular. The contractor we used was funny and said that gold is old!
 |
| Bathroom Cleaned Out |
The one thing I liked about this bathroom though was that you could keep A LOT of stuff in the vanity and medicine cabinet.
One time back in 2013 my husband was away on a business trip and I had not cleaned out this bathroom in a long time. Thanks to my blogger buddy at Exquisitely Unremarkable, who inspired me to clean out my bathroom, and did a blog post on organizing her bathroom, found Here.
Well, thankfully I looked underneath the cabinet sink and I found a LEAK. My daughter had her friends over and they could hear me yelling GET ME PAPER TOWELS so loud. I had to clean up the mess as best I could and throw out a lot of damaged products. I had to call the plumber to come and fix the leak and he also fixed the toilet that was not working properly either.
To this day my daughter and her friends still laugh at hearing me yell for the paper towels! LOL!
Ever since that whole incident, I have been cleaning out and organizing each of the rooms in my house.
 |
The vanity and the shelf were made of white Formica. My daughter and I used this bathroom a lot and the Formica was very sturdy and it did not leave any stains on the counters.
 |
You can see that the white tile in the shower was very old and the window too.
 |
 |
It was so hard to keep things organized as the counter was always cluttered with a lot of stuff.
 |
In the fall of 2017, we finally decided to do a gut and redo on this bathroom.
The big decision for us was to figure out what contractor was going to do this work. We have had some really good contractors in the past but they don't do this kind of work anymore.
Last year I had new blinds that I bought and had installed and put up in my kitchen from Lowe's. I was so happy with their selection of blinds and the service that they provided. The blinds in the kitchen were also old and needed a new update. I originally wanted to have Blinds To Go do my blinds but they wanted close to one thousand dollars just for two windows. I wanted the Roman Shade style with a pretty fabric in a chevron pattern. We were not willing to pay that much money! I love my new shades and I didn't spend anywhere near that amount of money. Thanks to my sister-in-law who suggested I try Lowe's for blinds.
I also had in the fall of 2017, a new custom-made glass shower door picked out and installed by Lowe's. This shower door is in our master bathroom and we love it. They did a great job putting it in and it took about four hours with two people from Lowe's to install and do the job. All of the people from Lowe's that do this kind of work are bonded and insured. I stayed and watched for hours while the people did the work!
** A good note is that when you decide to get work done in your house do not leave anything valuable lying around such as wallets, credit cards, money, or fancy jewelry.
This is Part One of my bathroom redo process, and please stay tuned for Part Two coming soon!
Thanks for stopping by and I hope you all enjoy the end of the week and weekend.
Don't forget to visit us for our Monday Cooking and Crafting with J & J Link Up!
Subscribe to:
Posts (Atom)


Social Icons